✦ AoY has officially entered 1st OBT phase! ✦
Glast Heim Rebellion
Age of Ymir · Systems

Glast Heim Rebellion

You arrive at the very start of this universe’s Calamity: a rebellion in Glast Heim Castle. Khalitzburg Hildegard and her Radiant Cavaliers fight the King’s Blackguards—mindless cavalry created with Absolute Dark Magic. Help the rebellion by killing Blackguards that bear a dark symbol; avoid killing Radiant Cavaliers or they turn hostile. Progress through the castle (left magic path or right physical path), face Possessed Lohengrin and the fallen King Reindhart, then enter the upper sanctum (second map) where Hildegard’s despair and the Dark Lord Mordekaz await.
Level 40+Party InstanceMajor RiftUnique Boss Gear
Glast Heim Rebellion Major Pulse Rift

Major Pulse Rift

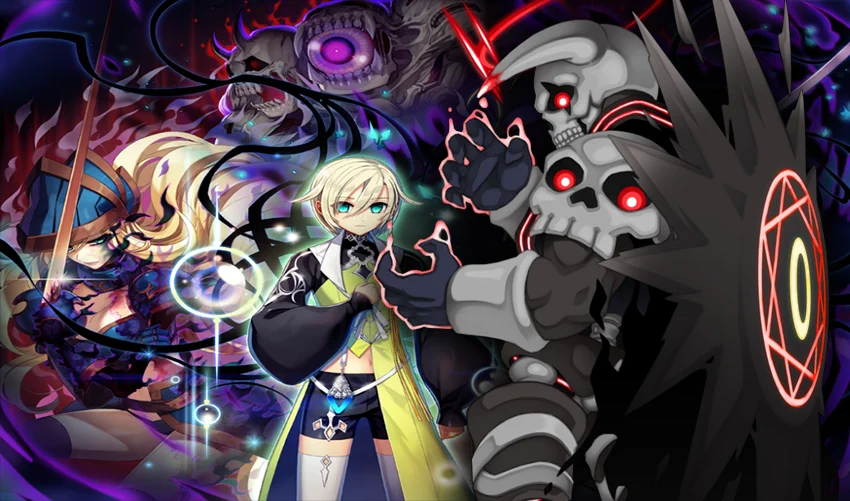
A Major Pulse Rift set during Glast Heim’s rebellion; parties aid Khalitzburg Hildegard against the King’s Blackguards, then confront Possessed Lohengrin, despair, and the Dark Lord Mordekaz in exchange for Chronocite rewards.


Instance Icon
This instance can be repeated.
This Pulse Rift has no cooldown period.

Apex Rift Stone Glast Heim Rebellion Instance

Apex Rift Stone
How to enter

Glast Heim Rebellion is a Major Pulse Rift. Entry is made by using an Apex Rift Stone—the stone opens a random Major Pulse Rift, which may be this instance.

  • Only the party leader can use the stone successfully.
  • Solo players must still create a party before using the stone.
  • Only party members present when the stone is used will have the instance created for them.

Rift Stones drop from monsters globally; see Obtaining Rift Stones for drop rates.


Requirements & Rewards
RequirementsReward Incentives
Base Level: 90+Chronocites (scales by difficulty)
Party: 1+Random Material & Equipment Drops
Time Limit: 2 hoursInstance Points and EXP Bonuses

Glast Heim Rebellion Pulse Rift Walkthrough

Instance Information
  • Instance Time Limit: 2 hours
  • Map Names: 1@gl_k (Glast Heim Castle), 2@gl_k (Upper Sanctum)
Dark Lord MordekazMVP
Instance Overview

Phase 1: Kill Blackguards with a dark symbol (mob 30127); do not kill Radiant Cavaliers or Hildegard turns hostile. Get Left or Right gate key. Phase 2: Left path (magic-resistant Blackguards + Arcanist boss 30131) or Right path (physical-resistant Blackguards + Bulwark boss 30132). Phase 2.3: Evade magic lines or arrow traps and reach the center. Phase 3: Sir Lohengrin opens the King’s chamber; find it empty, then face Possessed Lohengrin (30133) and King Reindhart. Kill Lohengrin, then clear Striders (30134) and warp to 2@gl_k. Phase 4: Talk to Hildegard, defeat Mordekaz Seed 1 (30136), then Despair Hildegard (30135). Phase 5: Mordekaz Seed 2 + Soldiers (30138)—kill soldiers to break the Seed’s protection, then kill Seed 2. Face Umbral Cavaliers (30133), Reindhart/Sakray cutscene, then Mordekaz (30139). Killing Umbral Cavaliers gives Mordekaz +100% damage taken for 2 minutes.

Blackguard Lancer / Arcanist / BulwarkBlackguard Lancer / Arcanist / Bulwark
Blackguard StriderBlackguard Strider
Mordekaz SoldierMordekaz Soldier
Umbral CavalierUmbral Cavalier
Arcanist CommanderArcanist Commander
Umbral KhalitzburgUmbral Khalitzburg
Bulwark CommanderBulwark Commander
Seed of MordekazSeed of Mordekaz
Glast Heim Castle (1@gl_k)1@gl_k (Glast Heim Castle)
Upper Sanctum (2@gl_k)2@gl_k (Upper Sanctum)
Step 1 - Enter & Phase 1: Thick of Battle
Enter the instance. Ymir announces that you have arrived at the very start of this universe’s Calamity; events are unwritten and her Temporal Aura cannot see the future—you must help this universe survive. Khalitzburg Hildegard greets you: the area is restricted; they are fighting the King’s Blackguards. She asks you to join the rebellion and to target only Blackguards that have a dark symbol on their feet (mob 30127). Do not kill Radiant Cavaliers (30125)—if you kill two or more, Hildegard accuses you of sabotage and sends more Radiant Cavaliers to attack. Clear the marked Blackguards; when enough are dead, Hildegard gives you a key for either the Left Gate or Right Gate (random). New warps open.
Step 2 - Phase 2: Left (Magic) or Right (Physical) Path
Left path (magic area): Blackguards here are highly resistant to magic and use dark magic (mob 30129). Clear them; when all are dead, Ymir senses a heavy presence and a Blackguard Arcanist (30131) boss spawns. Defeat it; Hildegard opens the gate on the upper left. Right path (physical area): Blackguards here are highly resistant to physical attacks and have heightened melee (mob 30130). Clear them; when all are dead, a Blackguard Bulwark (30132) boss spawns. Defeat it; Hildegard opens the gate on the upper right. You then enter a trap corridor: Left—unseen Arcanists cast magic lines; Right—unseen Striders fire arrows. Evade the lines/arrows and reach the center where Hildegard and Sir Lohengrin are.
Step 3 - Phase 3: King’s Chamber & Possessed Lohengrin
Hildegard and Sir Lohengrin explain the King is in the middle chamber and that the rebellion is to save the kingdom; the King used Absolute Dark Magic to create the mindless cavalry. Lohengrin opens the gate. Enter the chamber—the King is not there. A voice cries: “Nooooo!! Sir Lohengrin!! What did you do to him?!” Possessed Lohengrin (30133) spawns; he is damage immune for a short time, then becomes attackable. King Reindhart and Khalitzburg Hildegard#3 appear; Hildegard sentences the King to death. Defeat Possessed Lohengrin; he says “..save Glast Heim.. please..” King Reindhart and Sakray have a short dialogue; the King warns about the Dark Lord and taunts about the upper sanctum. A warp opens to return to the sanctum entrance. Touch the new warp trigger: you cannot sense Ymir—a bad omen. Hildegard announces she slipped past the Striders and that you must fight through; Striders (30134) spawn. Kill at least one Strider to open the warp to 2@gl_k (fog, night). There is a small chance to gain an Arcane Key (for the Arcane Arbalest later).
Step 4 - Phase 4: Upper Sanctum (2@gl_k) & Hildegard’s Despair
On map 2@gl_k, find and talk to Khalitzburg Hildegard#4. She says everyone has been possessed, they are too late, the King and Dark Lord have won, and everyone in the castle is gone but her; she is in despair. Talk to her again: Ymir’s voice breaks through—find two sources of corruption and be careful of Hildegard’s growing despair. Mordekaz Seed 1 (30136) spawns; Hildegard transforms (30137) and fights. Defeat the Seed first; then Hildegard says she has avenged her comrades and is free, and dies. Despair Hildegard (30135) spawns. Defeat her; Ymir says the blocking power has weakened and she will force the gates open. Mordekaz Seed 2 (30136) and Mordekaz Soldiers (30138) appear. The Seed is damage immune until you kill at least one Soldier—then the “absolute protection of the seed is gone.” Defeat the Seed; Ymir says the force blocking her is gone and to search the right-most part of the sanctum for a strong dark presence.
Step 5 - Phase 5: Dark Lord Mordekaz
Enter the right-most area. Umbral Cavaliers (30133) spawn. Reindhart and Sakray appear; Reindhart is sacrificed by Sakray as an offering for the Dark Lord’s physical body. Ymir announces she will use her temporal magic to sever Mordekaz’s link to this universe. Mordekaz (30139) spawns. If you have the Arcane Key from the Striders, you can use the Arcane Arbalest for a chance to deal extra damage to Mordekaz. Killing 10 + difficulty Umbral Cavaliers applies a debuff to Mordekaz: he takes +100% damage from all sources for 2 minutes. Defeat Mordekaz to complete the instance. Ymir’s Projection appears—she says Glast Heim was still annihilated despite your efforts, but this universe still lives. Choose Take me back to warp to Aurelia (192, 153). There is a chance for a Lost Rift Traveller (30113) to spawn after Mordekaz for extra rewards.

Featured Monsters

Monster Information
MonsterLevelHPDefMdefSizeElementRace
9949,000300300LargeNeutralDemihuman
9959,000100500LargeNeutralDemihuman
9975,000500100LargeNeutralDemihuman
9955,000100100LargeNeutralDemihuman
9575,0009090MediumUndeadUndead
951,000,000100100MediumUndeadUndead
951,300,00050500MediumUndeadUndead
951,500,000100100MediumUndeadUndead
952,000,00050050MediumUndeadUndead
952,000,000200200MediumUndeadUndead
982,000,000150150MediumUndeadUndead

Difficulty Modes

Each run assigns a random difficulty mode that scales monster strength, EXP, and rewards. Chronocites are guaranteed on completion; bonus completion drops are rolled per character. For the full rules behind Rift randomization and difficulty scaling, see Rift Mechanics.

Randomization Settings
DifficultyMonster BoostEXP BonusReward Chronocites
Normal Mode Easy
No Boostx1
Chronocite 5 Chronocites
Veteran Mode Veteran
+50% Statsx1.5
Chronocite 10 Chronocites
Nightmare Mode Nightmare
+100% Statsx2
Chronocite 15 Chronocites
Hell Mode Hell
+150% Statsx2.5
Chronocite 20 Chronocites
Torment Mode Torment
+200% Statsx3
Chronocite 25 Chronocites
Completion Reward Odds (per character)
DifficultyBlacksmith Blessing Blacksmith Blessing (x1)Blacksmith Blessing Blacksmith Blessing (x3)Entropy Codex Entropy Codex (x1)Entropy Codex Entropy Codex (x5)
Easy Mode Easy
15%5%5%2%
Veteran Mode Veteran
20%10%8%5%
Nightmare Mode Nightmare
25%15%10%7%
Hell Mode Hell
30%20%15%12%
Torment Mode Torment
35%25%20%17%

Chronocite Party Rewards

Rewards in this rift come from three layers:

  • Completion rewards (per character): party members online and on the instance map receive guaranteed Chronocites and get completion roll chances (Entropy Codex / Blacksmith Blessing).

  • Blackguard drops (during Phase 1 & 2): defeating Blackguards can drop Paradox Shards via two independent rolls:

    • Single roll (1× Paradox Shard): 1% / 3% / 5% / 7.5% / 10% (Easy → Torment). On Torment, party sharing is enabled at 50% of the killer chance.
    • Bundle roll (2× Paradox Shard): 0.4% (killer) / 0.2% (party) base + difficulty bonus.
  • Boss corpse drops (party loot): bosses spawn corpse drops at their location with multiple independent rolls for rift loot—including Paradox Shards and Rift-exclusive gear. Some corpse drops are influenced by difficulty.

    Rift-exclusive gear: 1% base drop chance + difficulty mode bonus.

For the global reward rules that apply across all Pulse Rifts, see Rift Rewards.

Reward Items
ItemTypeDescription
Chronocite ChronociteCurrencyUsed to buy items from the Pulse Rift Shop Manager.
Paradox Shard Paradox ShardCurrencyDropped from Blackguards and boss corpse drops; used to enchant end‑game gear.
Entropy Codex Entropy CodexMaterialA mysterious tome from Rift Bosses that distorts space and time, letting you call forth a powerful Field Boss via the Pulse Rift.
Blacksmith Blessing Blacksmith BlessingMaterialPrevents downgrade on refine fail.
Black Khalitzburg Helm Black Khalitzburg HelmEquipment
Rift Exclusive helm worn by a tainted knight.
  • 1H Spear: ASPD +10% (+3% per 2 refine)
  • 2H Spear: Ranged DMG +10% (+3% per 2 refine)
  • Bow / Katar: Crit DMG +10% (+3% per 2 refine)
  • Knuckle / Dagger: Melee DMG +10% (+3% per 2 refine)
  • Requirement: Base Level 90
Blue Khalitzburg Helm Blue Khalitzburg HelmEquipment
Rift Exclusive helm worn by a tainted knight.
  • 1H Sword / Staff: M DMG to all classes +10% (+3% per 2 refine)
  • 2H Sword / Axe: Melee DMG +10% (+3% per 2 refine)
  • Huuma / Whip / Instrument: Ranged DMG +10% (+3% per 2 refine)
  • Requirement: Base Level 90
Mordekaz Bone Helm Mordekaz Bone HelmEquipment
Rift Exclusive helm with a powerful dark aura.
  • Per 2 refine: ATK/MATK +10
  • Refine ≥ 9: P DMG to Large +20%
  • Refine ≥ 13: P DMG to Large +15%
  • Refine ≥ 15: Resist P DMG from Large +20%
  • 3% chance to autocast level 10 Hell’s Judgement when using any skill on a target
  • Requirement: Base Level 90
Final boss unique gear: 1% base drop chance + difficulty bonus.

Strategy Tips

Tips & Strategies
  • In Phase 1, only attack Blackguards with the dark symbol (the ones Hildegard marks). Killing Radiant Cavaliers causes Hildegard to turn hostile and spawn many more.
  • Left path favors physical DPS (enemies resist magic); right path favors magic DPS (enemies resist physical). Choose according to your party.
  • In the trap corridors, watch for magic lines or arrow patterns and move between safe tiles; no need to kill anything.
  • Kill Mordekaz Soldiers first in Phase 4 so the second Seed loses its damage immunity, then focus the Seed.
  • In Phase 5, killing enough Umbral Cavaliers (10 + difficulty level) makes Mordekaz take +100% damage for 2 minutes—time your burst during that window.
  • If you got an Arcane Key from the Striders, use the Arcane Arbalest before or during the Mordekaz fight for a chance to deal extra damage.