Exclude the complete client folder before extracting or patching.
Security software can remove the required dqe.dll module and leave the client unable to start.
Mouse lag, high ping, and scaling problems have focused fixes.
Use the polling-rate fix for Gepard mouse lag, Cloudflare 1.1.1.1 for routing issues, and dgVoodoo or dinput.ini for display setup.
Gray World reduces the rendering load from map-related textures.
Patch first, back up the standard files, install the resource in the active client directory, and confirm that map textures appear gray.
Set up Gray World safelyChibi Mode requires the updated Gepard license and the correct GRF order.
Patch first, place chibi.grf at index 0, and rename only the obsolete gepard.grf sprite archive so it cannot override the Chibi ACT files.
AzzyAI requires the correct AI folder and custom Homunculus mode.
Back up the existing AI folder, install the resource in the game directory, and use /hoai until the customized confirmation appears.
Bring useful details when asking for help.
Include screenshots, the exact error text, your install folder, Windows version, and what you already tried so support can narrow it down quickly.
Open a support ticket Required Client Security Exclusions
Add the entire Age of Ymir installation directory to your antivirus exclusion or allow list. Excluding only Age of Ymir.exe is not enough because the client also requires modules such as dqe.dll and gepard.dll.
C:\Games\Age of Ymirdqe.dllWhy this can happen
The Age of Ymir client and some anti-cheat components currently do not carry a trusted code-signing certificate. Newly repacked files also have limited reputation data, so reputation-based or heuristic protection may classify an official client component as suspicious even when it is the expected file.
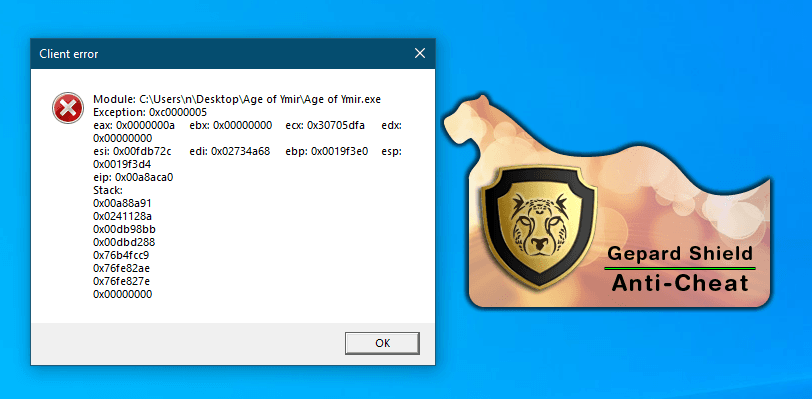
If dqe.dll is quarantined or deleted, Gepard may appear briefly before the client closes, or Windows may show an exception such as 0xc0000005, Error loading grf dll, or another client startup error.
Important: Follow these steps only for a client downloaded from the official Age of Ymir Downloads page. Never allow or restore a similarly named file obtained from a DLL mirror, another player, or an unofficial archive.
1. Prepare the installation folder
- Create a dedicated folder outside
Program Files, OneDrive, Desktop, and Documents. We recommendC:\Games\Age of Ymir. - Move the official client archive into
C:\Games, but do not extract it yet. - Update Windows Security and your antivirus definitions before creating the exclusion.
2. Add the folder to Microsoft Defender exclusions
- Open Start, search for Windows Security, and open it.
- Select Virus & threat protection.
- Under Virus & threat protection settings, select Manage settings.
- Scroll to Exclusions and select Add or remove exclusions. Approve the Windows administrator prompt if shown.
- Select Add an exclusion > Folder.
- Choose the complete installation folder, such as
C:\Games\Age of Ymir, and confirm it appears in the exclusions list.
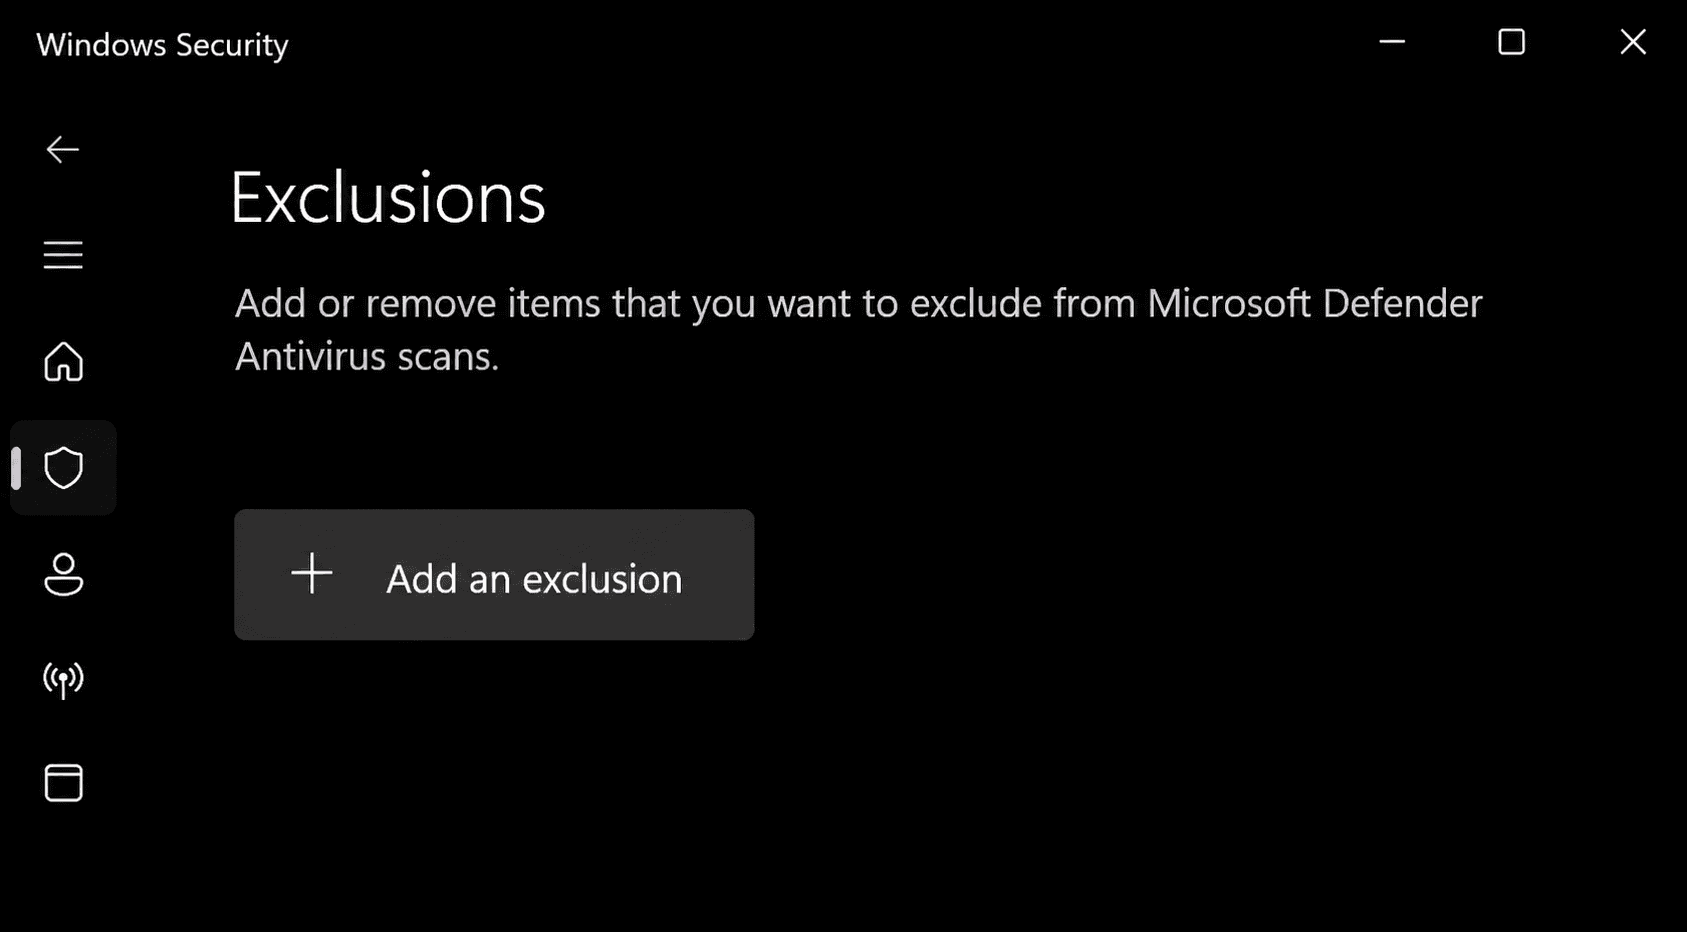
Microsoft warns that excluded folders are not checked by Defender's real-time protection. Keep the exclusion limited to the dedicated AoY folder, and never save unrelated downloads inside it. A Defender exclusion also does not control Webroot or another third-party antivirus.
Read Microsoft's Windows Security exclusion guidance.
3. Restore or replace dqe.dll if it was already removed
- In Windows Security, open Virus & threat protection > Protection history.
- If the detected item points to your official Age of Ymir folder, open it and choose Restore or Allow on device. Do not restore anything from an unrelated location.
- After the folder exclusion is active, extract a fresh copy of the official full client into that folder, or run the official launcher's repair/patch process.
- Confirm that
Age of Ymir.exe,AoY Launcher.exe,dqe.dll, andgepard.dllare present together in the game directory.
Why there is no standalone DLL link: dqe.dll must match the current client release. Re-extracting the official package is safer than downloading a loose DLL and prevents version mismatches.
4. Check Smart App Control on Windows 11
A Defender folder exclusion does not bypass Smart App Control. If Windows specifically reports that Smart App Control blocked the verified AoY client, Windows does not provide a per-app allow button for that protection.
- Open Windows Security > App & browser control.
- Select Smart App Control settings.
- If it is On and is blocking the official client, select Off, confirm the warning, and restart Windows before trying again.
Turning Smart App Control off reduces Windows protection for every app, not only Age of Ymir. Microsoft's current guidance says recent Windows updates can allow it to be re-enabled, but availability depends on the Windows build and configuration; some systems may require a Windows reset or reinstall. Read the warning shown on your PC before confirming.
Smart App Control checks cloud reputation first and then a valid signature. Because the current AoY client is unsigned and is distributed to a smaller community, it can be treated as untrusted when Windows cannot establish sufficient reputation.
Read Microsoft's Smart App Control FAQ.
5. Webroot and other third-party antivirus tools
Webroot has been observed labeling the official dqe.dll as Win32.LocalInfect.2. In that support case it was a false positive, but the quarantine action still removed the required module and caused the client to fail.
- Open your antivirus quarantine or threat history and verify that the path belongs to your official AoY folder.
- Restore
dqe.dll, set it to Allow, and add the complete Age of Ymir folder to the product's allow list or folder override, including subfolders. - If the product blocks the archive before an exception can be created, pause it only long enough to extract the official package into the already prepared folder, then immediately turn protection back on.
- If a managed PC does not let you create an override, contact its administrator or the antivirus vendor. Do not leave protection disabled.
Webroot folder/file override guidance.
6. Request a second-opinion malware analysis
If your antivirus flags an official AoY file, submit that exact file for analysis to both Microsoft and your antivirus vendor for additional peace of mind. This gives each security provider the opportunity to inspect the same sample and correct a false-positive classification.
- Confirm that the detected file came from the official Age of Ymir package and note its full path, detection name, AoY client version, and the security product and definition version that reported it. If you are unsure, leave the file quarantined and do not run it while you wait for the analysis result.
- Open the Microsoft Security Intelligence file-submission portal. Choose the customer type that applies to you and report the sample as a file you believe was incorrectly detected.
- Submit the same exact file through your antivirus company's official false-positive or sample-analysis portal. Include the detection name, the official AoY download source, and the client version so its analysts have enough context.
- On a company-managed computer, contact your IT or security team and let them submit or review the sample. Do not disable managed protection, bypass company policy, or upload company-owned data yourself.
- Submit only the specific flagged AoY executable or DLL requested for analysis—not the multi-gigabyte client archive, unrelated files, screenshots containing personal information, account data, saved credentials, or configuration files.
File submission shares the selected sample with the security provider. Use only the provider's official website, review its privacy terms, and keep the submission ID or analysis result for your support ticket.
7. Launch and verify
- Run
AoY Launcher.exeas administrator and let it finish patching. - Open
Setup.exeand selectDirectX 9. - Launch the game. If the same error remains, restart Windows once and retry.
- If it still fails, open a support ticket with a screenshot, the exact detection name, your antivirus product, and confirmation that
dqe.dllis present.
 Common Client Issues
Use this section when the client fails to open, Gepard shows an error, the patcher hangs, or the game launches with the wrong graphics device.
Run the game tools as Administrator
Age of Ymir.exe,Setup.exe,OpenSetup.exeor theAoY Launcher.exe.- Set the Graphics API to
DirectX 9inSetup.exe. - Right-click
Age of Ymir.exe-> Properties -> Compatibility -> set to Windows 7 or Windows XP SP3. - Enable Run as Administrator for both
Age of Ymir.exeandAoY Launcher.exe. - Avoid installing in
Program Files. Preferred directory:C:\Games\Age of YmirorC:\Age of Ymir. - Keep updated with the latest patches via the
AoY Launcher.exe.
Insecure Software Detected
- Anti-cheat systems and unsigned client files can be falsely flagged by reputation-based protection.
- Complete the required client security exclusions, then restore or re-extract the official client if
dqe.dllis missing. - For additional peace of mind, follow the second-opinion analysis steps and submit the exact flagged file to Microsoft and your antivirus vendor.
Gepard Shield Issues (init d3d or GRF)
- Open
AoY Launcher.exe
- Set Graphics API to
DirectX 9. - Choose proper resolution and graphic device.
- Uncheck Full Screen.
- Adjust or disable Sound Mode.
- Select "Delete all RO-related settings (Factory Reset)".
- Set Graphics API to
- Install the game outside
Program Files.
Illegal Software Warning
- Some mouse/keyboard software may trigger false positives.
- Close such programs before launching the game.
Gepard Cannot Validate License
- Check your internet connection.
- Add exceptions in your antivirus/firewall for game files.
Low FPS / Freezing on Windows 10/11 with NVIDIA
- In NVIDIA Control Panel > Manage 3D Settings > Program Settings (for
Age of Ymir.exe):- Set Max Frame Rate:
60 FPS - Monitor Tech:
Fixed Refresh - Preferred Refresh Rate:
Application-controlled - V-Sync:
Use the 3D application setting
- Set Max Frame Rate:
 Gepard Mouse Lag Issue/Fix
If the game lags when you move your mouse on the game screen, this can be caused by Gepard Shield reacting poorly to mice with a high default polling/report rate.
Lowering DPI may seem to reduce the issue, but it does not fully fix it. The important setting is the mouse polling rate or report rate.
- Open your mouse software, such as Logitech G HUB, Razer Synapse, SteelSeries GG, Corsair iCUE, or your mouse brand's equivalent tool.
- Find the polling rate, report rate, or USB report rate setting.
- Set it to a lower value such as 125 Hz or 250 Hz.
- Apply the change, then restart the game client.
This has fixed mouse-movement lag for affected players.
 1.1.1.1 App by Cloudflare
Experiencing lag, high ping, or unstable gameplay? Try using the 1.1.1.1 App by Cloudflare. It is a free, lightweight DNS tool that can help stabilize your connection and reduce latency.
Why use the DNS app?
- Faster, more stable internet
- Improved privacy and DNS security
- Optimizes routing to AoY game servers
- Available for Windows, macOS, Android, and iOS
 Download the 1.1.1.1 App (Cloudflare)
Installs in under a minute. No advanced setup needed.
 Setup for HD/4K/8K Displays (dgVoodoo)
For high-resolution monitors, use dgVoodoo to improve compatibility and scaling.
Installation
- Download dgVoodoo 2.79.3 from the Downloads Page.
- Extract into your Age of Ymir directory (e.g.
C:\Age of Ymir). - Copy these files from the extracted folder to your Age of Ymir directory:
D3D8.dll,D3D9.dll,D3Dlmm.dll,DDraw.dll,dgVoodooCpl.exe,dgVoodoo.conf.
Configuration
Forcing Dedicated GPU on Laptops
If you're using a laptop with both integrated and dedicated graphics (e.g., Intel + NVIDIA), follow these steps to ensure the game uses your dedicated GPU:
- Configure NVIDIA Control Panel (for NVIDIA GPUs):
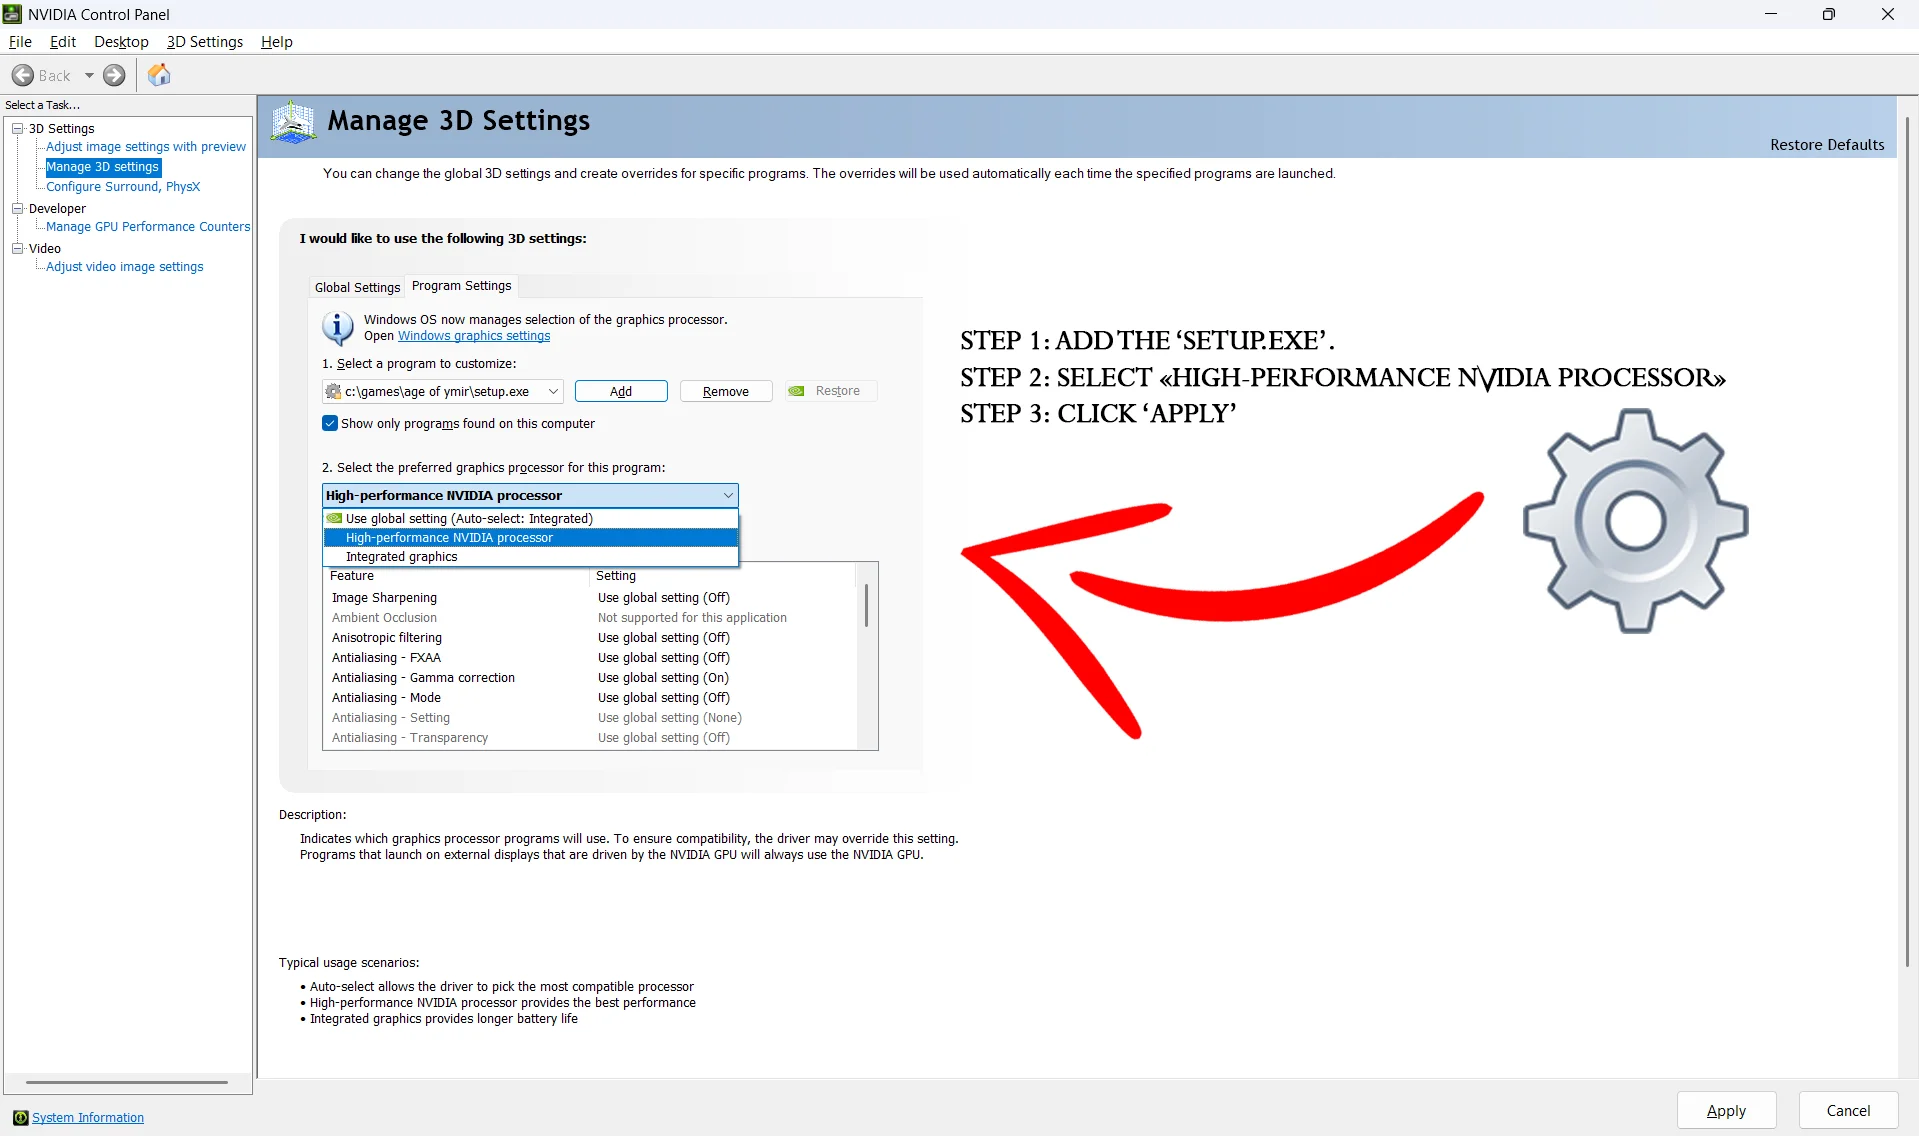
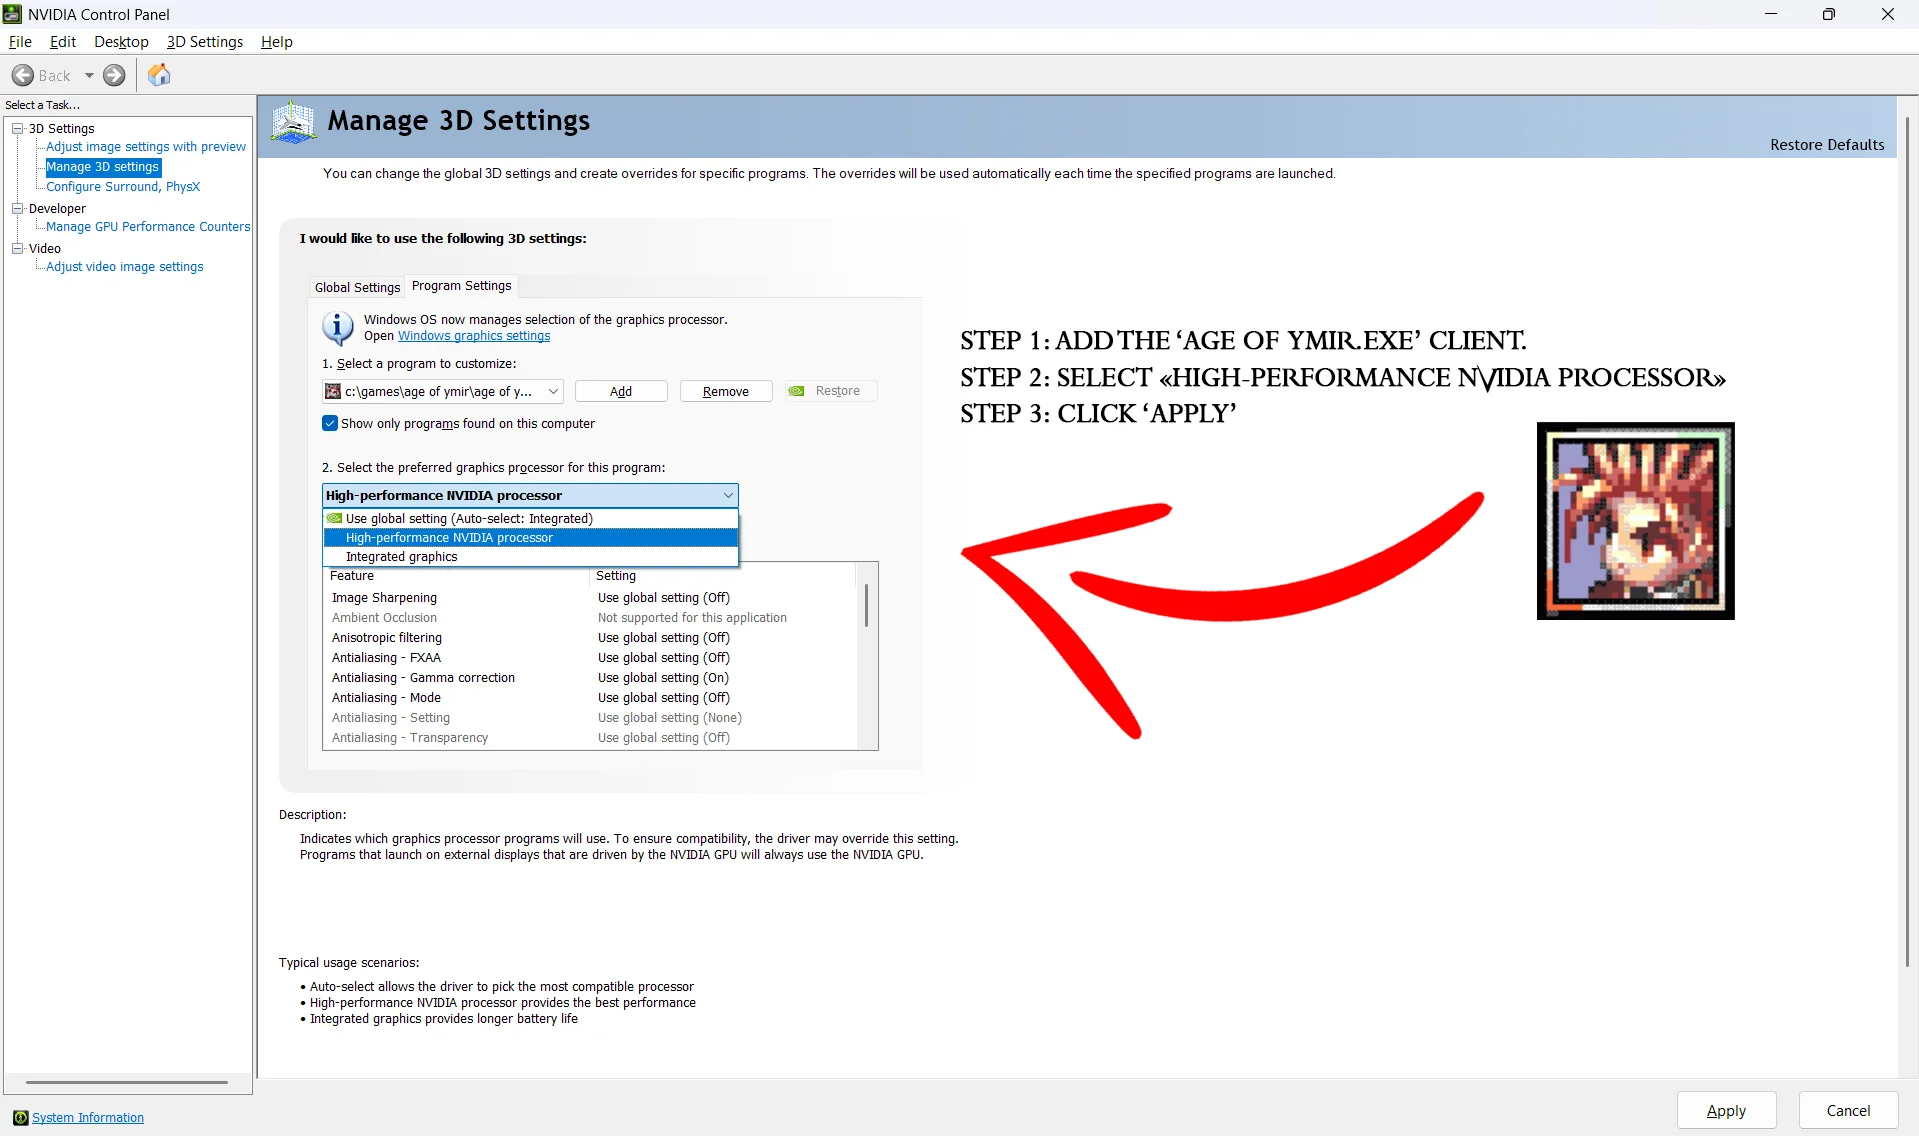
- Open NVIDIA Control Panel -> Manage 3D settings -> Program Settings.
- Click Add and select
Age of Ymir.exe(or browse to your game folder). Also addSetup.exeorOpenSetup.exeif present.
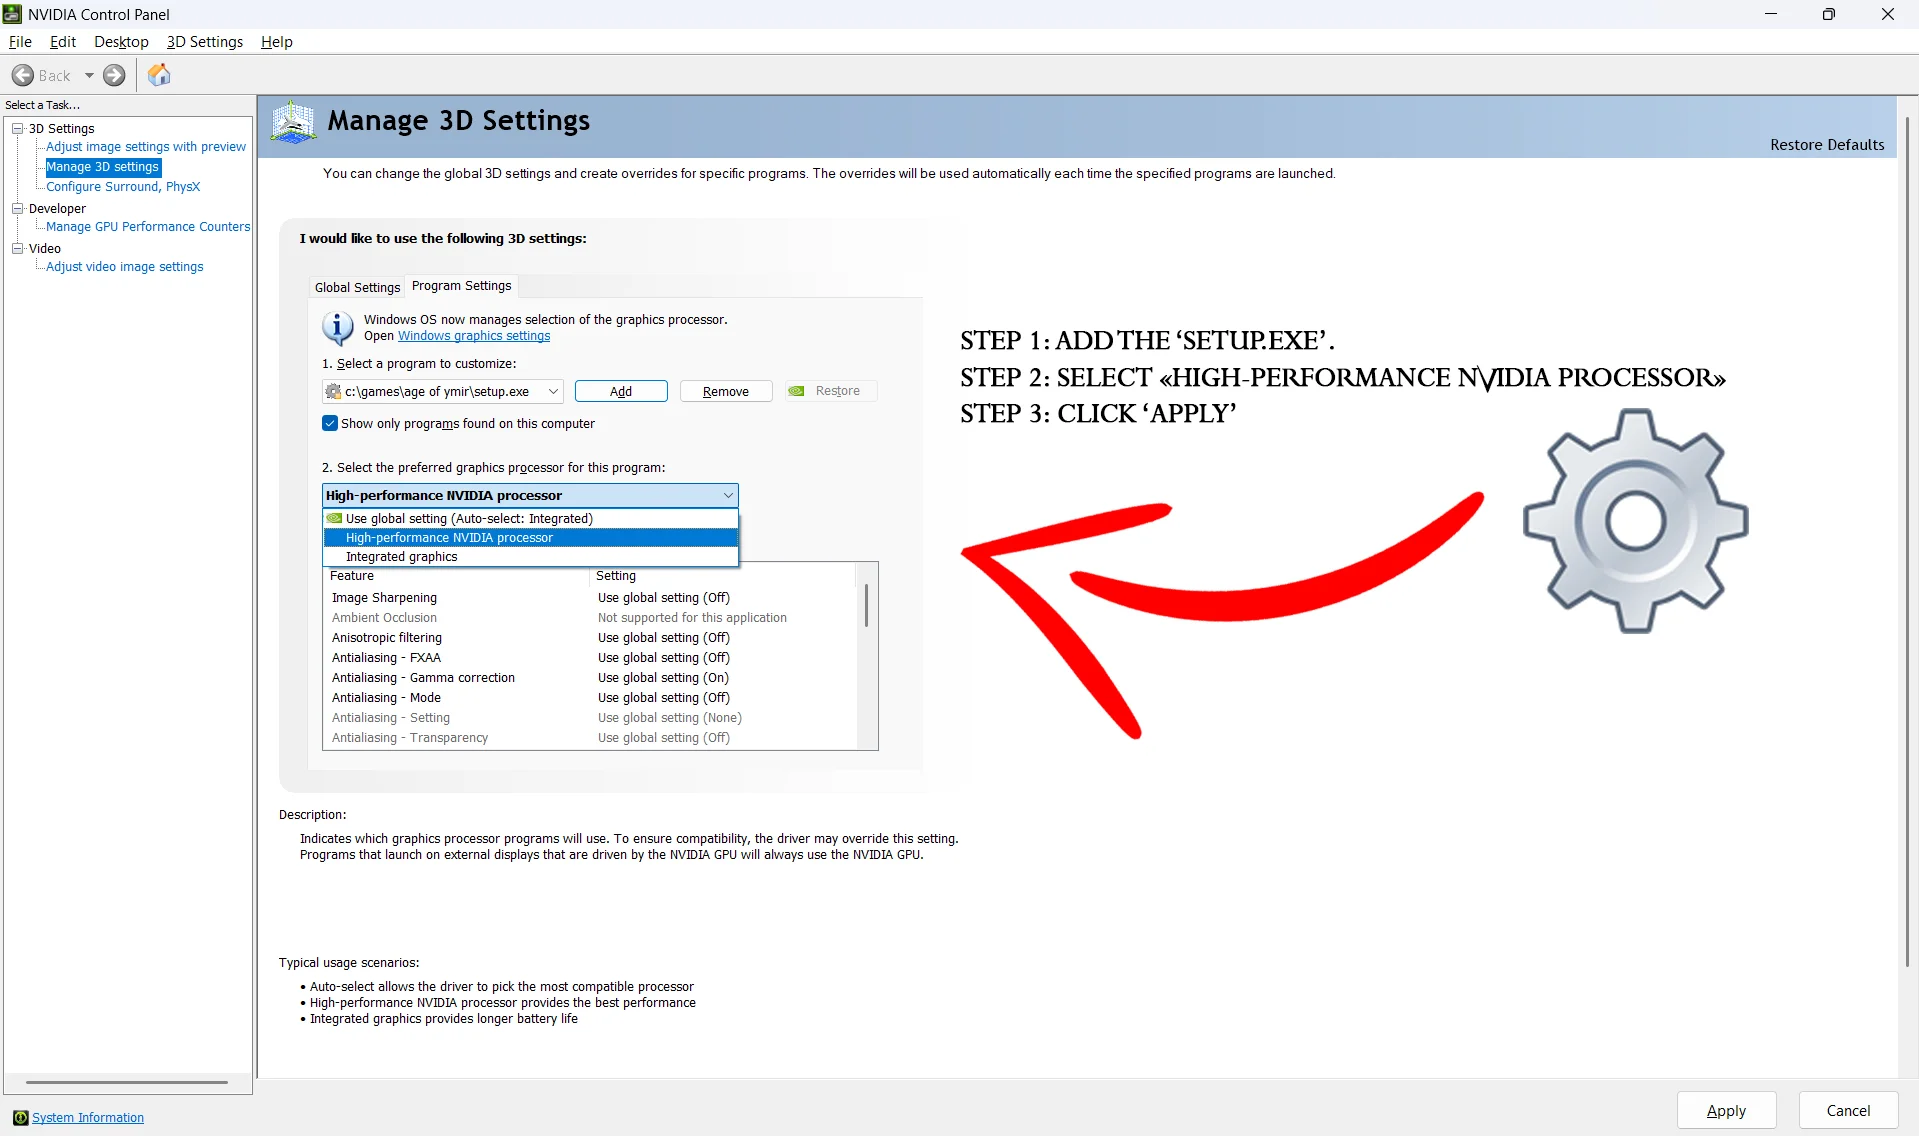
- For each program, set Preferred graphics processor to High-performance NVIDIA processor.
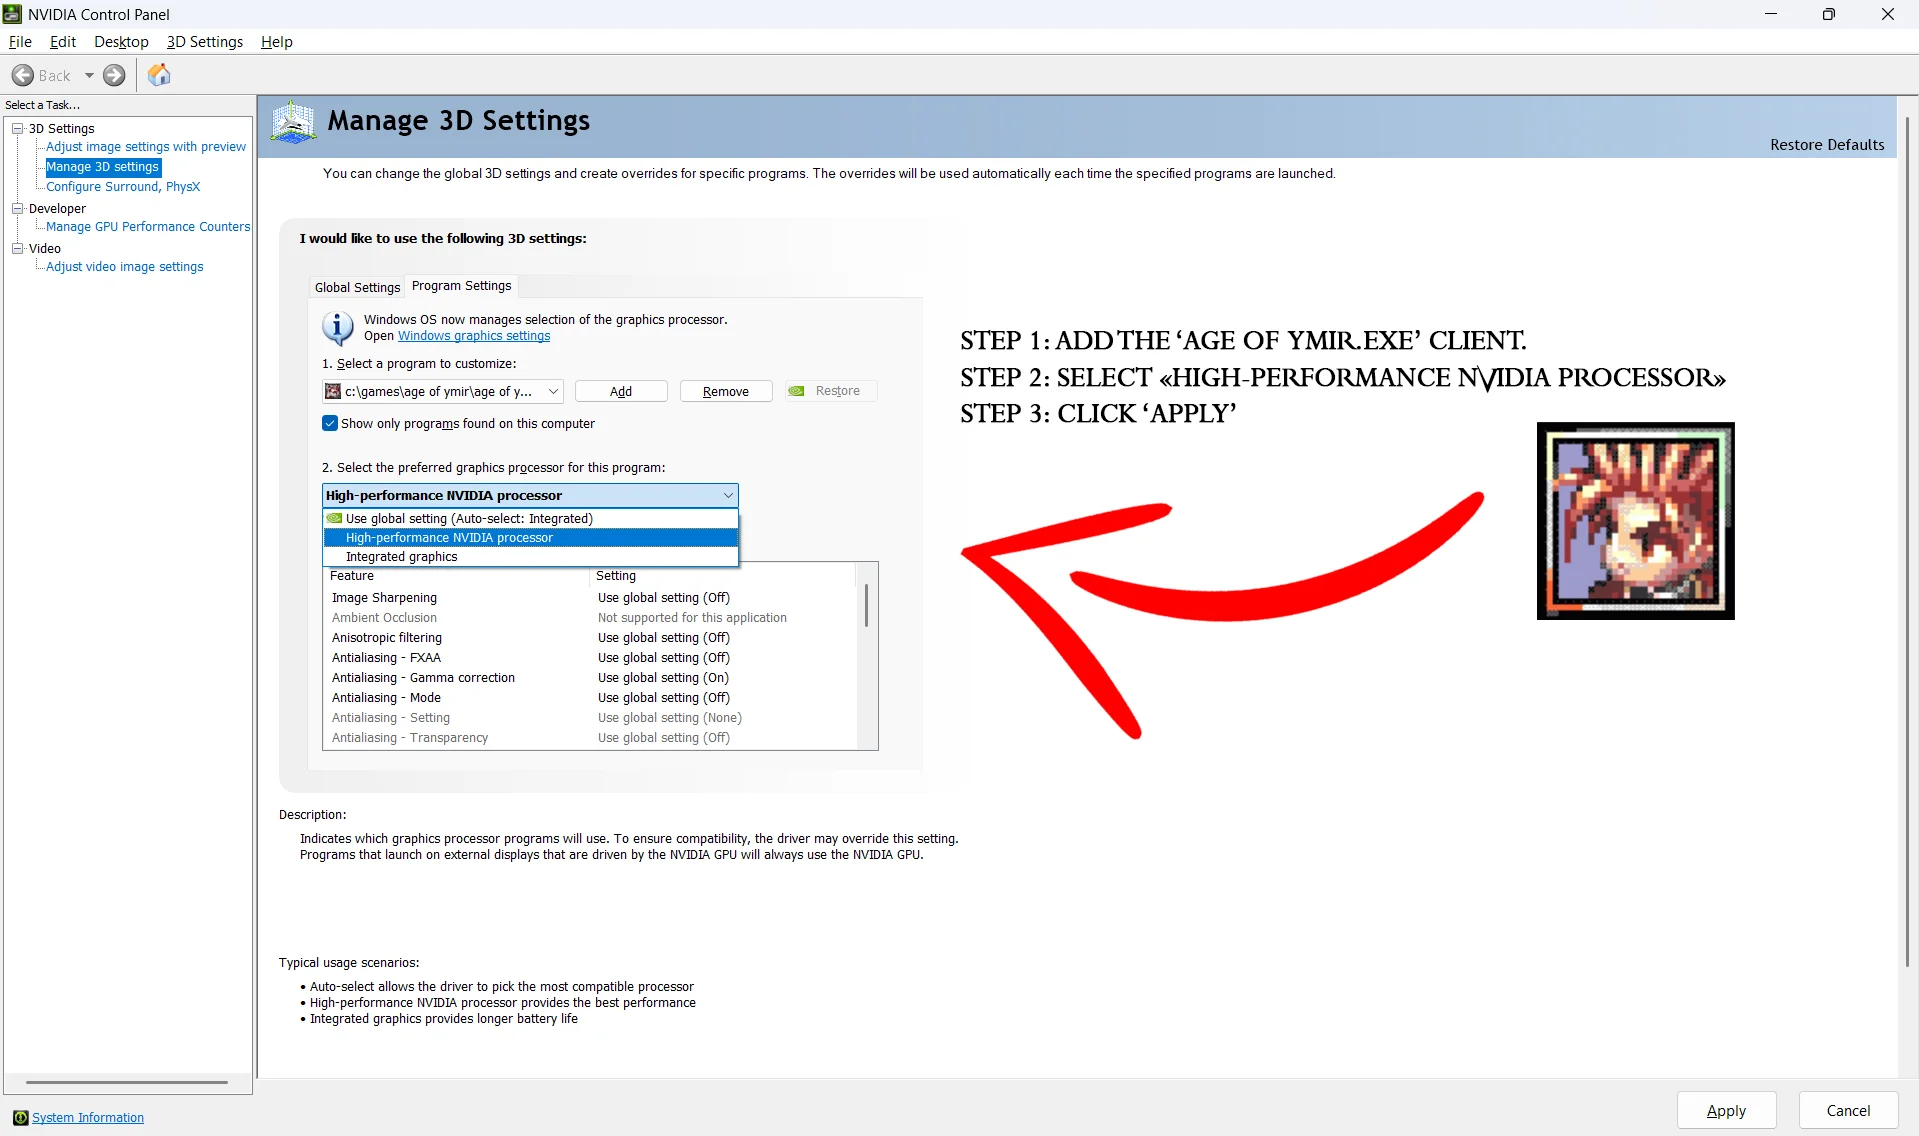
- Click Apply and close the control panel.
Note: For AMD GPUs, use AMD Radeon Settings -> System -> Switchable Graphics and set the game to High Performance. - Configure dgVoodoo Control Panel:
- Close the game if it's running. Run
dgVoodooCpl.exefrom your Age of Ymir directory. - In the General Tab: Set Adapter(s) to use / enable to your dedicated GPU. Set Scaling mode to
Stretched, keep Aspect Ratio. Ensure Windowed is selected if you prefer windowed mode.
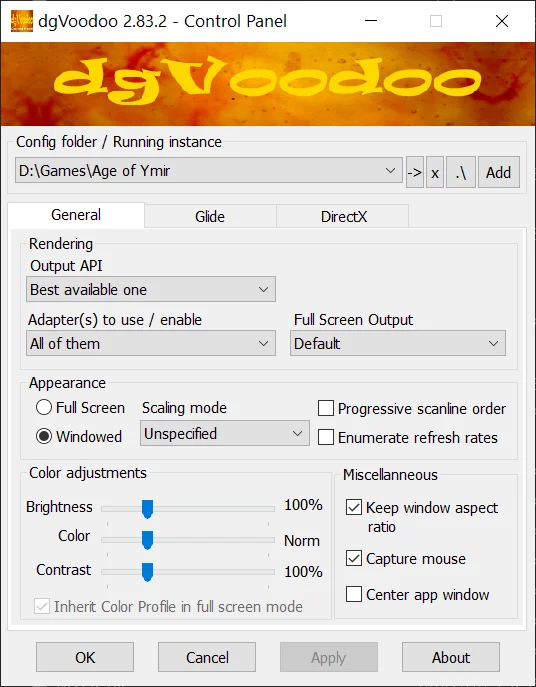
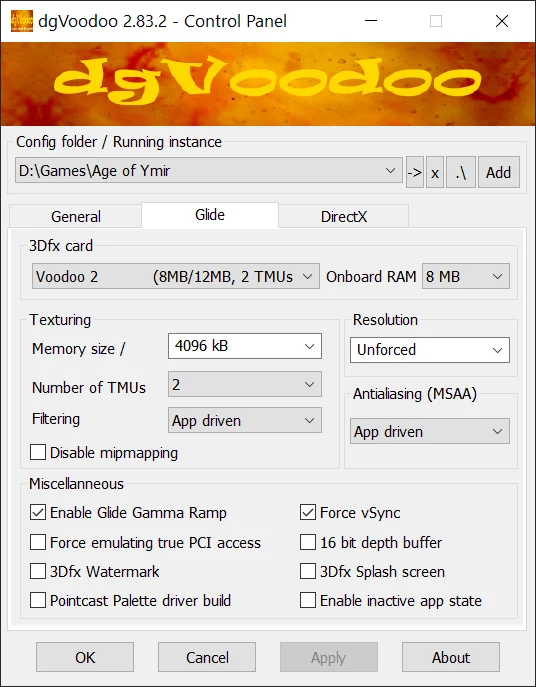
- In the DirectX Tab: If you want to use real DirectX instead of dgVoodoo's wrapper, enable Disable and passthru to real DirectX. Set resolution to your monitor's native resolution. Disable dgVoodoo Watermark. Enable Force VSync if needed. Click OK to save.
- Close the game if it's running. Run
- Verify GPU Selection in Game Setup: Run
Setup.exeorOpenSetup.exe. In the Graphics tab, select your dedicated GPU (e.g. "NVIDIA GeForce GTX... [dgVoodoo TnL HAL]") and click OK.
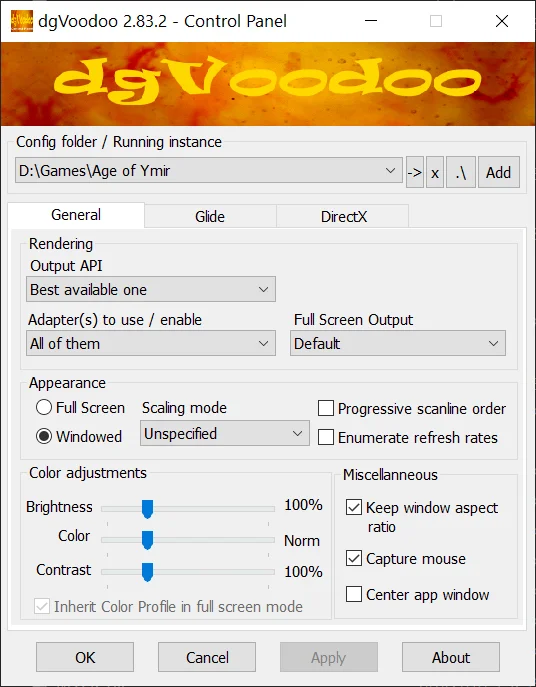
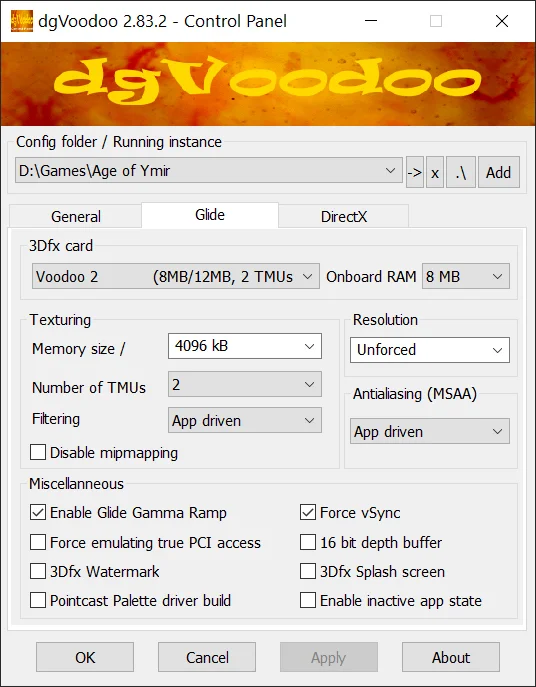
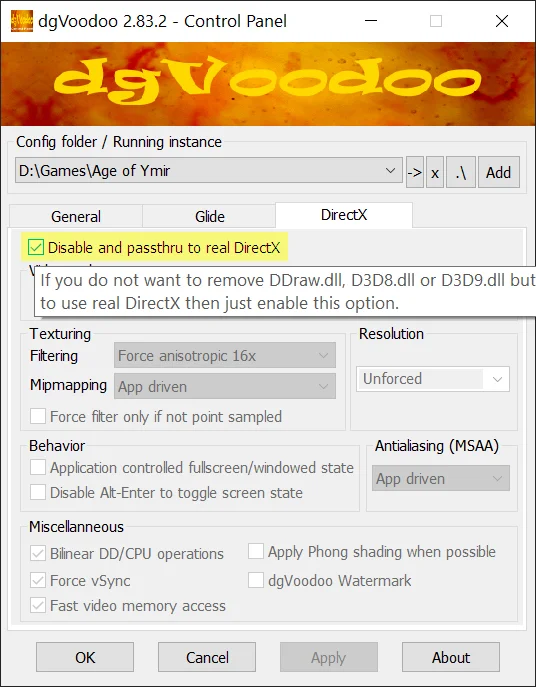
Launch the game and verify GPU usage in Task Manager or your GPU monitoring software.
Fix Small UI on 4K
Right-click Age of Ymir.exe -> Properties -> Compatibility -> Change High DPI Settings:
- Override high DPI scaling behavior
- Select:
System (Enhanced)
Use dinput.ini for Custom Resolution
If you want to override the RO window size or position, create or edit dinput.ini in your game folder:
; Override RO window position and size.
; Ignored if WindowWidth = 0 or WindowHeight = 0.
; Command line switch: -wX,Y,Width,Height
WindowPosX =0
WindowPosY =0
WindowWidth =1920
WindowHeight =1080
Ensure WindowWidth and WindowHeight are set to match your desired resolution.
Special Characters Setup
To display non-English characters:
- Copy
dinput.dllanddinput.iniinto your game folder.
2. Edit dinput.ini and set:
CodePage = 6500151932= Japanese |51949= Korean |51950or51936= Chinese |1251= Russian |65001= Unicode / All Languages
3. Save and launch the game.
Gray World Modification
Gray World is a permitted visual client modification for systems that need a lighter rendering workload. It replaces map-related textures with gray versions to reduce texture complexity and GPU load. It does not change character stats, combat, rewards, or other gameplay mechanics.
Install Gray World only after the launcher has finished patching, with both the launcher and game closed. Before replacing any same-named file, save a copy outside the game directory so you can restore the standard visuals later.
Install Gray World
- Run
AoY Launcher.exeand install every available patch. When patching finishes, close both the launcher and the game. - Download the Gray World Textures (GRF) resource.
- Open or extract the download, then copy all of its contained files into the main Age of Ymir directory—the same folder that contains
Age of Ymir.exeandDATA.INI. Preserve the supplied folder structure and merge folders when Windows asks. - Launch Age of Ymir and enter a map. Map-related textures should now appear gray; that visual change confirms the modification is active.
Check the installation location
The Gray World files must be in the client installation you actually launch. If you keep more than one Age of Ymir copy, right-click the launcher shortcut, choose Open file location, and install the resource there. Do not leave the files inside the downloaded archive or inside an extra nested folder.
If the normal map textures still appear
- Confirm that the resource was fully extracted and that
graymap.grfis inside the main game directory rather than a Downloads folder or nested resource folder. - Confirm that the launcher and game were closed while you copied the files.
- Confirm that you modified the same Age of Ymir installation used by your launcher shortcut.
- If you ran the patcher after installing Gray World, close it and apply the Gray World resource again; a client repair or patch may restore standard files.
Remove Gray World
Close the game and launcher, then restore the files you backed up before installation. If no backup is available, restore the standard client from an official Age of Ymir package and let the launcher apply all current patches. Do not delete unrelated GRF or configuration files. The same resource is also available from the Age of Ymir Downloads page.
 Chibi Mode Sprite Modification
Chibi Mode is a permitted cosmetic client modification. It replaces character sprite resources with smaller Chibi versions; it does not disable Gepard Shield or change gameplay.
The current signed Gepard license disables ACT/SPR resource-module protection and no longer requires the legacy gepard.grf sprite archive. An older license or a remaining gepard.grf can prevent the Chibi sprites from appearing.
Install Chibi Mode
- Run
AoY Launcher.exeand install every available patch. When patching finishes, close both the launcher and the game. - Download the official Chibi Mode Sprite GRF and place
chibi.grfin the main Age of Ymir directory. - Rename the legacy
gepard.grffile togepard.grf.disabled. The client can load that archive by filename even when it is absent fromDATA.INI, and its full-size ACT files otherwise override Chibi Mode. - Back up
DATA.INI. Addchibi.grfat index0, remove anygepard.grfentry, and renumber the remaining archives consecutively.
A standard Age of Ymir configuration should look like this:
[data]
0=chibi.grf
1=pdata.grf
2=palette.grf
3=adata.grf
4=data.grfDo not rename, remove, or replace gepard.dll, gepard.license, or Age of Ymir.exe. Only the no-longer-required legacy sprite archive named gepard.grf is renamed for this cosmetic modification.
If the normal-size sprites still appear
- Confirm that the launcher installed every current patch before you edited
DATA.INI. - Confirm that no file is still named exactly
gepard.grf. - Confirm that
0=chibi.grfis the first entry and that every following index is consecutive, with no duplicates or gaps. - Confirm that
chibi.grfis in the same directory asAge of Ymir.exeandDATA.INI.
Turn Chibi Mode off
Close the game, restore your original DATA.INI, rename gepard.grf.disabled back to gepard.grf, and remove chibi.grf. You can also review the matching instructions on the Age of Ymir Downloads page.
 AzzyAI (Homunculi)
AzzyAI provides customized behavior and automation for your Homunculus companion. The files belong in the main Age of Ymir directory, and the in-game /hoai command must be set to custom mode before the client will use them.
Copy the existing AI folder to a safe location before installing or replacing AI files. This gives you a clean recovery path if an older customization conflicts with AzzyAI or you later want to return to the default files.
Install and enable AzzyAI
- Download the AzzyAI (Homunculi) resource.
- Close Age of Ymir and the launcher. Open or extract the resource, then paste all contained files into the main Age of Ymir directory—the folder containing
Age of Ymir.exe. Allow Windows to merge the includedAIfolder when prompted. - Launch the game, log in, and enter
/hoaiin chat until the message Homunculus has been customized appears. Stop after that confirmation because/hoaiswitches between default and custom AI modes.
Verify the setup
- The command confirmation must say Homunculus has been customized. A default-mode confirmation means AzzyAI is not currently enabled.
- The installed files should resolve under
Age of Ymir\AI. If the download created an extra outer folder, move its contents to the game directory rather than leaving a path such asAge of Ymir\AzzyAI\AI. - Restart the client after copying or replacing AI files so it loads the new scripts.
If AzzyAI does not activate or shows a LUA error
- Close the client and confirm that the resource was extracted instead of being left inside its archive.
- Check for an extra nested folder and confirm that the active installation contains the
AIdirectory. - Rename the current
AIfolder toAI.backup, install a fresh copy from the resource, and restart the client. Keep the backup until the new installation is working. - Enter
/hoaionce at a time and read the chat response. Stop as soon as the customized confirmation appears so you do not immediately toggle back to default mode.
Return to the default Homunculus AI
Use /hoai to switch back to default mode and verify the response in chat. To remove AzzyAI completely, close the client and launcher, then restore your backed-up AI folder or replace it with the standard AI files from an official Age of Ymir client package.
 General Issues
Failed Patch
- Close and restart the patcher.
- If still failing after a few tries, wait a bit. Server issues may resolve on their own.
- Open a
 Support Ticket on our
  Discord if the problem persists.
 - If
AoY Launcher.exehangs, end the process via Task Manager.
 Best Regards!
Troubleshooting can be a journey of patience, persistence, and learning. Thank you for taking the time to resolve your issue with us.
If challenges arise again, this page will always be here to guide you. For further technical assistance, you are always welcome on our Discord server.
Kind regards,
The AoY Team.